How to Use the Magic Wand Tool in Photoshop: A Beginner’s Guide

Learn Tags

00The Magic Wand tool in Photoshop is basically a tool for selecting similar colors. In other words, when you click on a specific color in an image, Photoshop automatically selects the surrounding areas that have the same color, putting them in a selected state.

  • Applicable Scenarios: It is suitable for images and backgrounds with noticeable color differences, backgrounds with a single color, or images with clear boundaries.
  • Principle: It works by creating a selection based on the color you click on. It automatically selects the surrounding areas that have a similar color, putting them in a selected state. This allows you to manipulate or edit those selected areas separately.
  • Drawbacks: It may not work well with images that have scattered hair or require precise edges. It may not provide satisfactory results in such cases.
  • How to Use it: To use it, you simply click on the “Magic Wand” tool, adjust the “Tolerance” value, click on the background color to create a selection, then invert the selection and use the copy command to extract the desired image.

Overall, the Magic Wand tool in Photoshop is widely used and is a tool that both professional designers and avid Photoshop enthusiasts will come across. However, despite its powerful functionality, the Magic Wand tool does have its limitations.

For example, it can be challenging for Photoshop beginners as it requires a certain level of skill and precision in selecting areas. It is not uncommon to accidentally select the wrong areas during the selection process.

Where Is the Magic Wand Tool in Photoshop?

The Magic Wand tool in Photoshop is a commonly used selection tool, which can usually be found in the left toolbar of Photoshop. However, due to the large number of tools in Photoshop, many similar tools are grouped together in the toolbar.

By default, Photoshop remembers the most recently used tool in the toolbar. If it is your first time using Photoshop, the default tool will be the first one in the grouping.

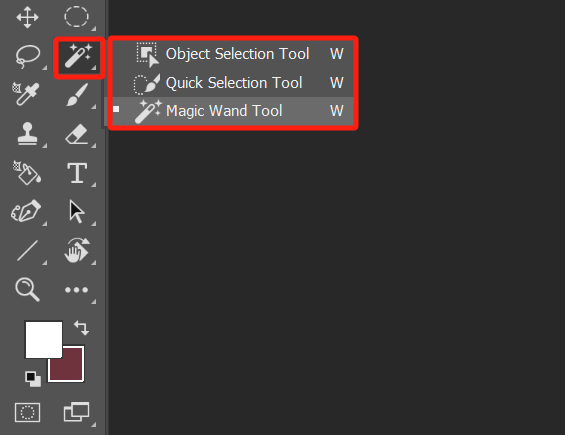
In Photoshop, the Magic Wand tool is grouped together with the Object Selection Tool and the Quick Selection Tool. You can refer to the image below to see the associated tool icons that go along with the Magic Wand tool, making it easier for you to find and select them later.

where is the Magic Wand tool in Photoshop

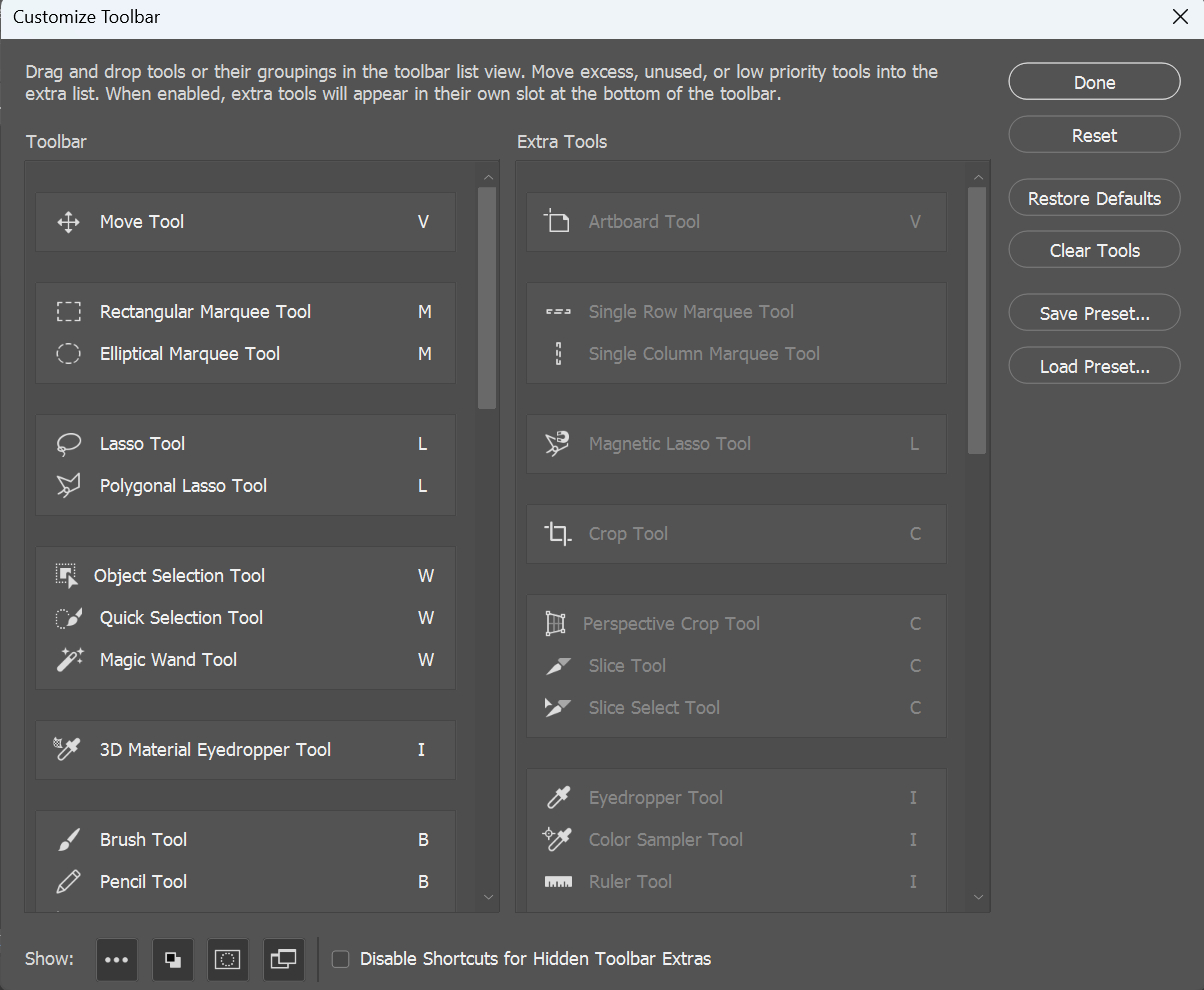
If you still can’t find the Magic Wand tool, you can click on the “Edit Toolbar” button above the color picker in the left toolbar. It is represented by an ellipsis icon.

Here, you will find the Extra Tools that are not included in the above tool groupings, as they are tools that Photoshop assumes you may use less frequently and have a lower priority.

By clicking on the “Edit Toolbar” option at the top of the pop-up menu, you can access the Customize Toolbar panel. Here, you can customize the toolbar based on your preferences and usage habits.

customize toolbar in Photoshop

How to Use the Magic Wand Tool in Photoshop?

The Magic Wand tool selects objects based on their color in the image. To use it, simply click the left mouse button on the desired color, and the colors close to the clicked point will be selected.

To master the Magic Wand tool in Photoshop, you only need to understand two important parameters: “Tolerance” and “Sample only contiguous pixels”.

In the following examples, we will explain how to use the Magic Wand tool in Photoshop by combining the meanings of these two parameters.

1. Tolerance of the Magic Wand Tool

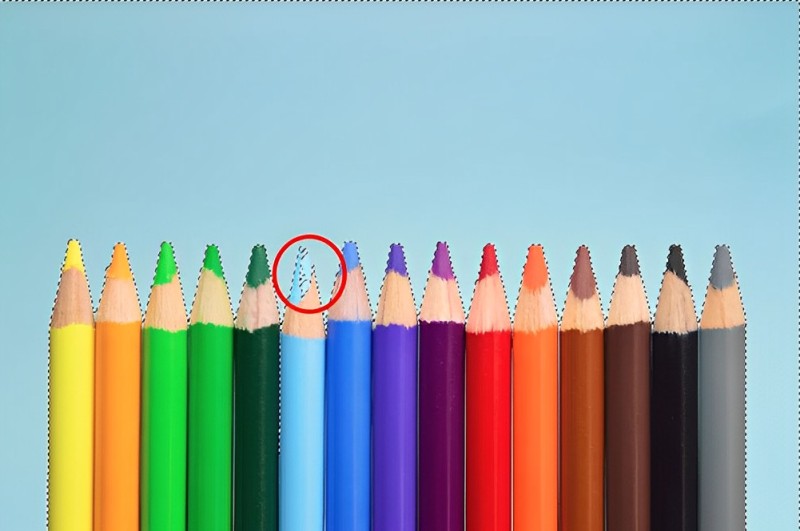
Let’s use the following colored pencil image for demonstration.

Magic Wand tool in Photoshop

Suppose you want to select all the pencils, but you find it challenging to select them directly. However, this image has a characteristic where the background color is uniform.

Therefore, you can use the Magic Wand tool to select the background and then invert the selection to select the pencils.

Let’s give it a try. Select the Magic Wand tool and then click on the background.

how to use Magic Wand tool

How can you select only the background without including the blue pencil? Here, you can use a parameter of the Magic Wand tool called “Tolerance”. (You can find and adjust this parameter in the toolbar above)

tolerance setting of Magic Wand tool

You can think of tolerance as the allowed color difference. The larger the value, the greater the allowed color difference, and the selection will include more colors that are similar to the sampled point.

Since we’ve accidentally selected some non-background blue, it means our tolerance for color difference is somewhat high. So, let’s try reducing the tolerance and change it from 30 to 15, then click on the background again.

Although we didn’t select the blue pencil this time, the background is still not fully selected.

Tolerance value of Magic Wand tool

It seems that the tolerance value is a bit too small. Let’s continue increasing the tolerance and see what happens. As the tolerance value increases, more of the background is selected, and there are more blue colors included in the selection.

However, when the tolerance value reaches 17, the background is still not completely selected, and a portion of the blue pencil is selected. This is because the color of the blue pencil is very close to the background color.

Magic Wand tool Tolerance value

Can’t you use the Magic Wand tool to select these pencils then? Of course, you can! Let’s try a different approach. Instead of trying to select the entire background with a single click, you can add to the selection gradually until all of the background is selected.

Let’s change the tolerance value back to 15, click on the background, and then hold down the Shift key (the shortcut for adding to the selection).

Click on the areas that are not yet selected. This will add more of the background to the selection. Repeat this process until all of the background is selected. (When using this method, it’s better to set the tolerance to a smaller value.)

how to use Magic Wand in Photoshop

Finally, all you need to do is invert the selection (Ctrl+Shift+I), and now all the pencils will be selected. Create a new mask, and you will successfully extract the pencils.

how to invert selection in Photoshop

2. Sample Only Contiguous Pixels of the Magic Wand Tool

Once you understand “Tolerance,” another important parameter is “Sample only contiguous pixels.”

When “Sample Only Contiguous Pixels” is selected, and you use the Magic Wand tool to select a color, if parts of that color are separated by other colors, they will not be selected. On the other hand, if it is not selected, regardless of whether the color is separated or not, it will be selected.

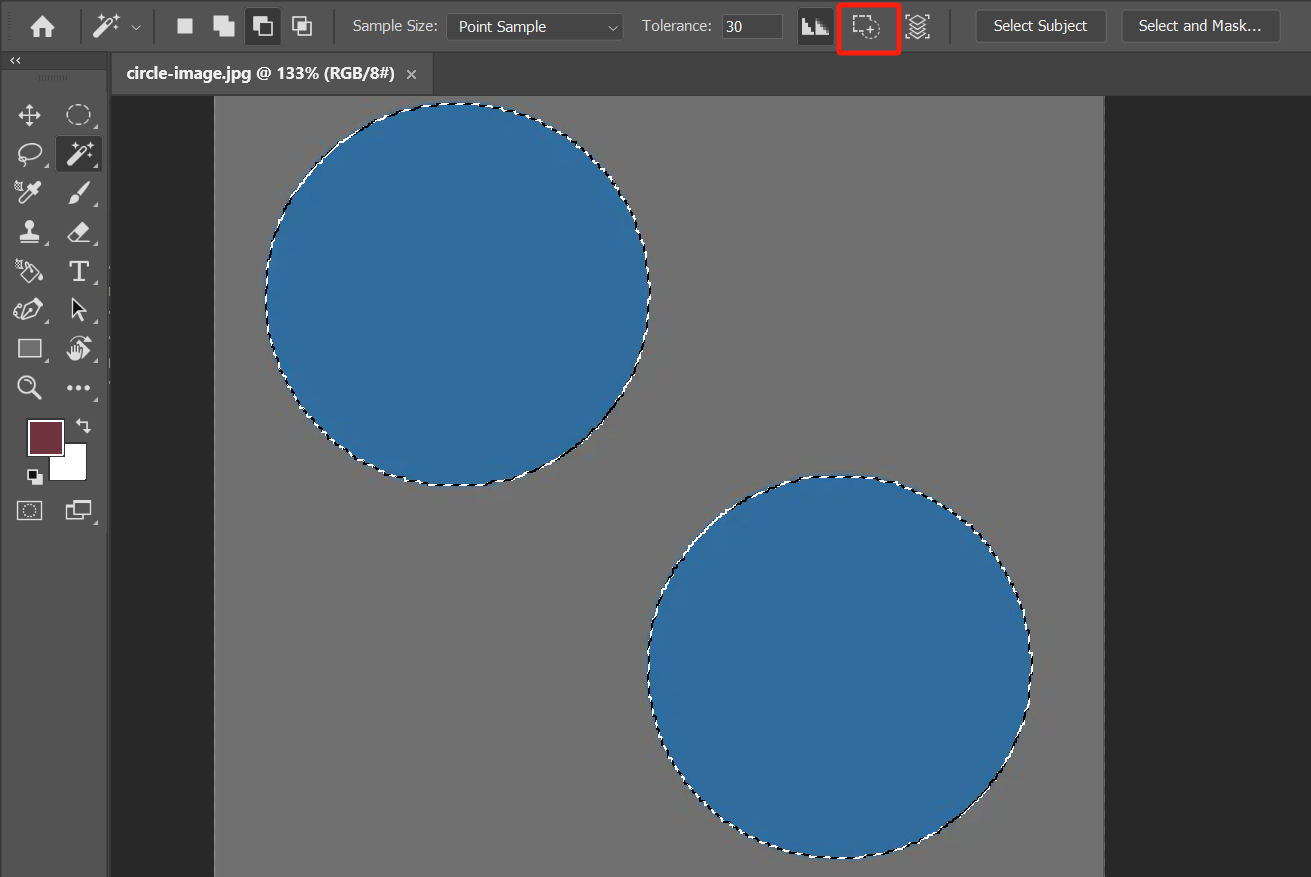
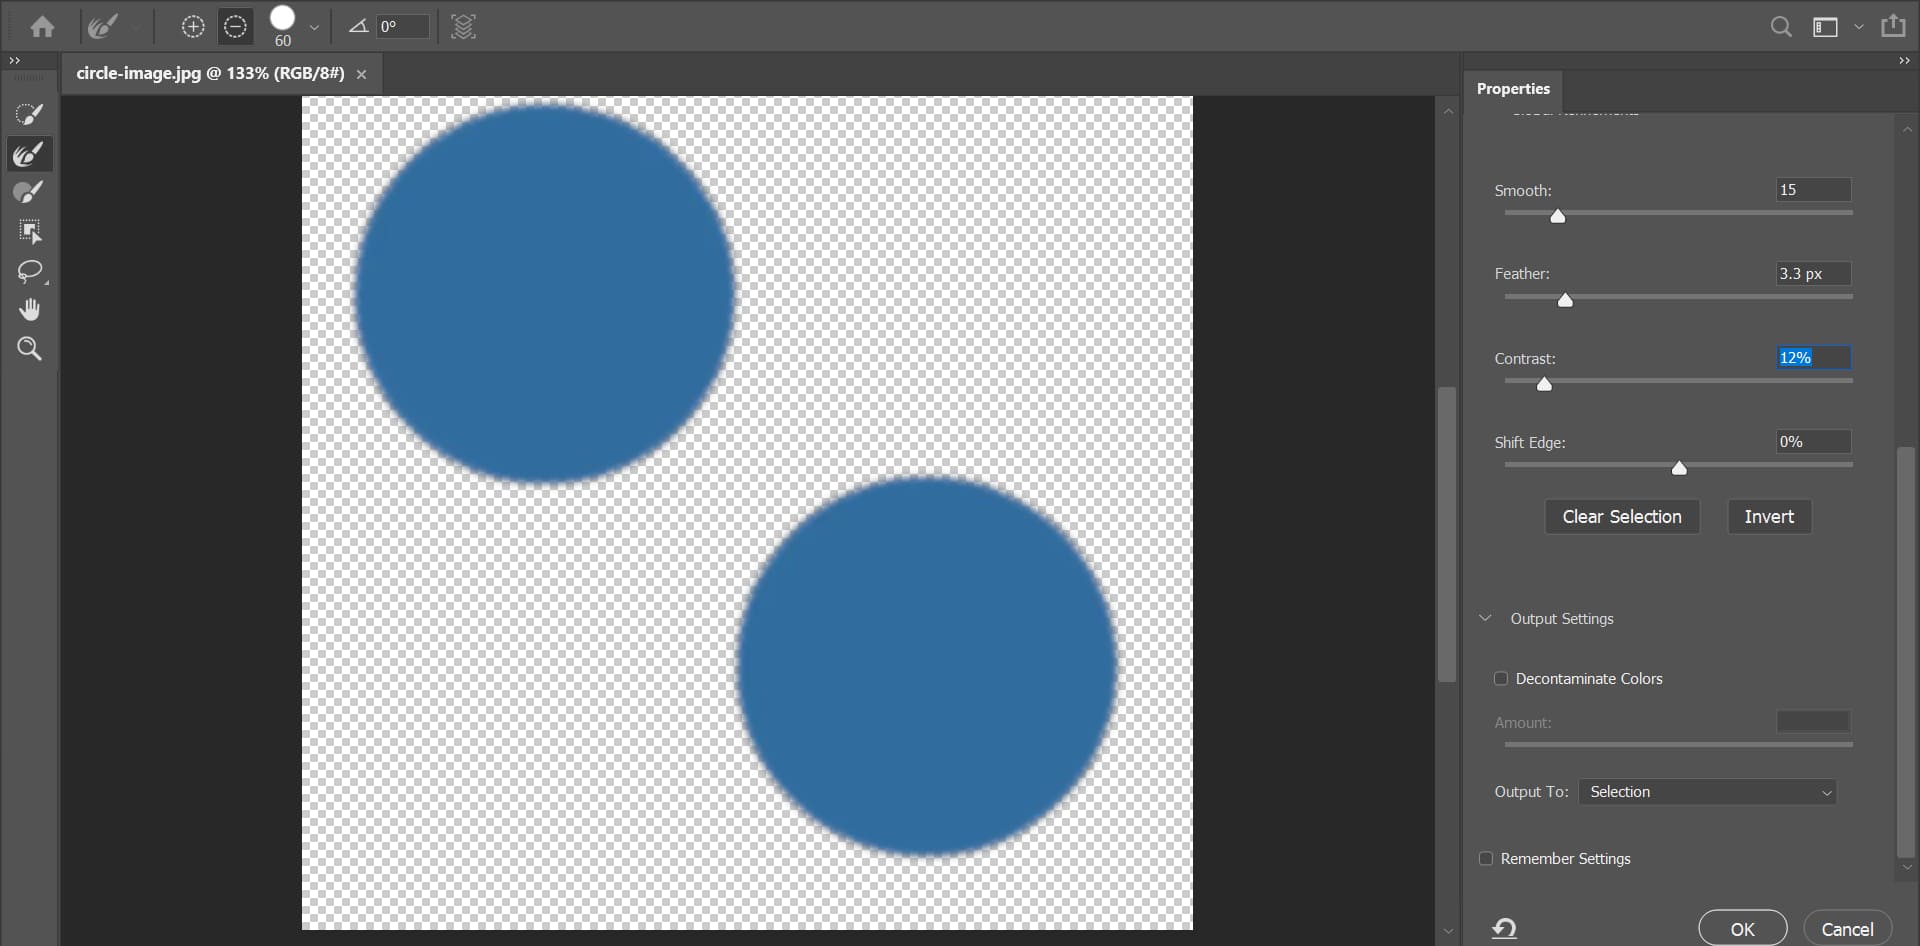
As shown in the image below, if you want to select the two blue circles, you can first select “Sample only contiguous pixels” and use the Magic Wand tool to click on one of the circles. Although the adjacent circles have the same color, they are separated by the gray color background, so they are not selected.

Sample Only Contiguous Pixels

Next, you can try unselecting “Sample only contiguous pixels” and click on one of the circles. You will notice that both circles are selected, even though they are separated by the gray color.

unselect sample onley contiguous pixels in Photoshop

3. Other Parameters of the Magic Wand Tool

Selection Method:

Like other selection tools, the Magic Wand tool also has options for “Add to selection”, “Subtract from selection”, and “Intersect with selection”. The keyboard shortcuts and usage methods are the same. You just need to master adding and subtracting from the selection.

Sample Size:

As the name suggests, it refers to the size of the sample point. You should choose the sample point size based on the image. If the image has a lot of noise, using the default “Point Sample” setting may include unwanted noise colors.

In such cases, you can choose “Average” and select different average sizes based on the noise and image dimensions. Generally, using the default “Point Sample” or a 3 by 3 Average is sufficient. Larger averages don’t necessarily provide better results.

Smoothes Edge Transition

This parameter does exactly what it implies - it helps to eliminate jagged edges and make the selection look more natural. In most cases, it is fine to leave it selected by default.

Sample Colors From Composite Image

This one is self-explanatory. If unchecked, it samples colors from the current layer only. If checked, it samples colors from all layers, considering the entire image.

Select Subject & Select and Mask

These two parameters are found in various selection tools, and they can be considered as independent selection tools themselves. You can further refine the selection using the Select and Mask option.

Select and Mask panel in Photoshop

Additional Tips for Using Photoshop Magic Wand Tool

In the final section of our Photoshop Magic Wand tutorial, we would like to provide some additional tips for using the Magic Wand tool:

  • One common problem with the Magic Wand tool is that sometimes it doesn’t select things correctly. This usually happens when there isn’t a clear difference between what you want to select and what you don’t want to select. Besides the techniques we mentioned earlier, you can also try using other tools in Photoshop to help you get the results you want.
  • When using the Magic Wand tool, it’s important to note that Photoshop has relatively high requirements for the image. If the image has low pixel density, it may affect the effectiveness of the Magic Wand tool.
  • During the selection process of many images, it is also necessary to properly refine the edges of the selection. Without edge refinement, the final result can appear very harsh and unnatural.

Product Recommendation:

If you’re looking to take your Photoshop skills to the next level and optimize your workflow, we highly recommend giving TourBox a try. It’s a game-changer that can significantly improve your editing process and help you achieve your creative vision more efficiently.

TourBox Creative ConsoleWhat Is TourBoxLearn More TourBox is a powerful and intuitive tool designed specifically for creative professionals working with software like Photoshop. It provides customizable buttons and rotating controls that can be easily set to perform various tasks and shortcuts, making your workflow more efficient and streamlined.

With TourBox, you can assign commonly used functions, such as adjusting brush sizes, zooming in and out, or navigating through layers, to its physical controls. This eliminates the need to constantly switch between your keyboard and mouse, allowing for a more seamless and intuitive editing process.

And that concludes our tutorial on the Photoshop Magic Wand tool. We hope it has been helpful to you on your creative journey.

FAQ

Magic wand untuk apa?

Alat ini berfungsi secara efektif sebagai vibrator klitoris dan mampu menghasilkan orgasme pada banyak wanita.

Magic wand untuk apa?

Alat ini berfungsi secara efektif sebagai vibrator klitoris dan mampu menghasilkan orgasme pada banyak wanita.

This site only collects related articles. Viewing the original, please copy and open the following link:How to Use the Magic Wand Tool in Photoshop: A Beginner’s Guide

wand vibrator
Latest Articles Popular Articles
Recommended Articles

Hitachi Magic Wand - Wikipedia

8 languages- বাংলা Deutsch Español فارسی Bahasa Indonesia 日本語 Русский 中文 Edit linkseditediteditediteditediteditediteditediteditediteditediteditediteditedit

Use The Magic Wand Tool Photoshop to Remove Background

Salim AhmedLast Update: February 25, 2024 Magic Wand Tool is a selection tool in Photoshop that helps users make a selection of an image or part of the image based on tone and color. This tool will assist you in selecting specific areas within an image and editing it independently. It selects solid backgrounds or any other colored area. The tool functions by analyzing the pixels in the image within the region where you’ve clicked. When you click with the tool, it selects the area. It will analyze and select all adjacent pixels that fall within a certain range of color and tone from the selected pixel. This range, known as the tolerance value, can typically be adjusted according to the user’s needs. For instance, a low tolerance value will result in a more precise selection, selecting pixels very similar to the clicked pixel. You can conveniently replace or remove backgrounds with Photoshop’s magic wand tool without changing the subject. Product photography and eCommerce shots are the areas where this tool is extensively used. The pixel selection process is entirely dissimilar to a Quick Selection. Based on a similar color and tone, it selects pixels. This tool doesn’t search for individual borders; it looks for a similar color canvas to complete its choices. Start Using the Magic Wand Tool to Remove a Background The Magic Wand tool makes selections to remove a background with just a few clicks, saving time and effort. To start using, it is important first to understand the working process. It gives the best result for images with a constantly colored background. Open the Image and Duplicate the Layer Opening it in Photoshop and Making a Duplication Layer of the Background Layer. In Photoshop CC, go to the File option at the top of the Menu Bar, select Open, and choose the image that will be Edited. Once the image is opened in Photoshop CC 2020, the Layer panel must be opened by selecting Window > Layer. Don’t forget to highlight the Background Layer at this stage. Now, make a duplication of the background layer. To do so, select Layer>Duplicate Layer You have to give a customized name to the duplicated Layer. Providing a name to the Duplicated Layer. As a result, you or your team member can easily access and use the file in the future. Background Layer Hiding Before starting the image editing, hiding the Original Background Layer will be significantly useful. This way, distraction will not happen when working in the duplicate Layer. Look at the left portion of the image thumbnail in the Layer Palette, and you will see an eye icon. Click on it to hide the Original Background Layer. Config The Magic Wand Tool in Photoshop In the Tools Palette, you will find the Magic Wand icon. The tools palette is placed on the left side of your computer screen. Or select the shortcut key “W.” If you don’t find the tool in the Tools palette, be sure it is hidden behind the Quick Selection Tool, and now, click on it and hold it for a few seconds. The tool will appear, and you can select it then. After selecting with the help of tool Parameters, you can control the maximum and minimum selection levels at a time. You will find the adjusting options on the working process at the upper portion of your computer screen. Single-Selection If you use the tool for the first time, this option must be selected. Add to Selection This option is automatically accessible if you press and hold the “Shift” key when working with the tool. Subtract from Selection With the help of this selection, removing pixels becomes accessible from your selection while you click on your selection area. Intersect with Selection The new selection, including the previous selection pixels, gets created in this selection. Sample Size Adjust the sample size by selecting only one color pixel at once, which is its default characteristic. If you command the tool to increase the size of the sample, it will average the pixel color around the sample into its selection criteria. Tolerance You can’t do it to select a larger area at once without adjusting the tolerance. It would be best to keep the range of Tolerance between 15–30. In our example image, you will find the tolerance level is 20. Make Selection With The Photoshop Magic Wand Tool There are two methods of selecting. Background Selection Subject Selection Depending on the image’s background color, you must pick any method from the above. Background Selection Does your image have a solid-colored background? If yes, you can select the background using the Magic Wand Tool. Then, you have to make Inverse to the selection. Refraining from doing any work in the Original Layer is essential. So, select the duplicate Layer and complete your work. Select the tool, and click on any portion of the image per your preference. Now press and hold the Shift key. At this point, don’t forget to click on background areas not selected at the initial stage—for example, the orange shadows. Then press Shift + Ctrl + I (for Windows), Shift + Command + I (for Mac). This will allow you to select Inverse, or the subject will be selected. Subject Selection Your working image backgrounds may have multiple colors. Photoshop CC 2020 or above has an advanced feature named “Select Subject”. This feature will help you to select the subject of the image. You can also select the most intricate subject easily with this feature. Make a duplicate Layer to do the editing work. Now, choose the Magic Tool and do not click on any image portion. Click on the Select Subject button at the top of the application. You will get a rough selection of the subject. You will find the Subtract from Selection option at the top of the screen. Next, click on any portion of the image except the subject’s shadow. These areas will be out of selection while editing the image. Now, maybe the question is in your mind. Can I use this tool if I have Photoshop’s older version? Yes, you can but there may be some limitations. Selecting the subject will not be an issue using the Magic Wand in the older version of Photoshop. For this, the background must be complex and a one-colored subject. To select the subject, you have to follow Method 01. The key difference is that you will not be able to select the Inverse after finalizing the selection. Inverse the Selection Once the background is mostly selected, you should inverse the selection to select the subject instead. To do this, go to the “Select” menu at the top of the screen and choose “Inverse.” Delete or Mask the Background With the subject selected, you can now delete the background. Click the “Delete” key on your keyboard and delete the selected background pixels. Alternatively, you can create a layer mask by clicking the “Add Layer Mask” button at the bottom of the Layers panel. This will allow you to make the background transparent non-destructively. After removing the background or making it transparent, you may need to do some cleanup. Zoom in and use the Eraser Tool or a soft brush on the layer mask to fine-tune the subject’s edges, ensuring a smooth transition between the subject and the transparent background. Refine Your Selection Edges Next, you must choose Select and Mask… positioned at the Select Subject option’s right side. In the older version of Photoshop, you will have this option: Select > Refine Edge. Now, a new window will appear. You will find a series of global controls on the right side, and Spot Adjustment Tools will appear on the left side. Select the View button from the Properties tab at the top right corner. Select the button, and if On Layers (Y) is deselected, select it. Don’t forget to do it. Now, you will see an isolated subject that doesn’t have a background. You can play with the features at this stage, but we will not use different features. Underneath Global Refinements is an option named Smooth function, and to the left of the screen, there is the Refine Edge Brush tool. We will take assistance from these two features. To smoothen any rough edges of the subject, drag the Smooth slider to the right side. Now click R to get access to the Refine Edge Tool. This feature will allow you to spot any specific areas of the photo. Using this tool is simple. First, select the tool and paint over the selection area where refinement is needed. Once you finish as per your requirement, go to the Output Setting in the lower right corner of your computer screen. From there, choose Output to Layer Mask and then hit OK. The subject is entirely isolated from the background by applying the Layer Mask option. Apply New Image Background We are at the final stage of this tutorial. You must have a preferred image you want to use as a background in your editing image. First, open the file of the background image. Press Ctrl + A to select the entire image. Then press Ctrl + C to copy it. Now, go to the file that contains the isolated subject. First, the unaltered background needs to be selected. Then press Ctrl + V to paste the background image into the isolated subject file. A new layer (with a new background) will appear in the Layer palette between the original and duplicate backgrounds. Now click on the eye icon of the original background to make it visible again. If your original image’s background is white, it will help if you decide to select the blend mode to multiply the new background image. As a result, you can drag the actual shadow back to the new image. Adding more layers as an additional background is also possible. You can see how the image will appear with a different background by toggling the eye icon. After creating layers, fill them up with solid colors to see your subject against a background that comes with a solid color option. Save Your Image Once satisfied with the result, save your image in a format that supports transparency, such as PNG. When to Apply the Magic Wand Tool? You can remove or replace the sky background or any other without any hassle. Moreover, It helps to remove the white background easily. Below are a few scenarios about when to apply the magic wand tool in an image. You can show your product in different environments. Your customer can see your product against a familiar and beautiful background. It will help you to improve customer engagement as well as product sales. With this technique, you don’t need to change the settings of your original image. You can change your product’s shape, background, and size without affecting the original image. This means that capturing multiple images is unnecessary, while you can change the background of the image. Most 3rd party marketplaces such as Amazon, Alibaba, and eBay want product advertisements with white backgrounds. Magic Wand Tool allows a person to make the background white. After making your product image with a white background, you can list your product on those 3rd party marketplaces without any trouble. If you want a more precious result for pixel-perfect selection, you can use the Pen Tool Photoshop. FAQs What is the Magic Wand Tool in Photoshop?The Magic Wand Tool is a tool in Photoshop that allows you to make a selection of a specific color or tone in an image with just a single click. Can I remove the background of an image?Yes, you can use the tool to remove the background of an image. By selecting the background with this magic wand tool, you can delete or replace it with a new one. How does a Magic Wand Tool select pixels?Magic Wand Tool selects pixels based on their similarity to the pixel you click on. It looks for pixels with a similar color or tone and includes them in the selection. How can I make a contiguous selection?To make a contiguous selection ensure that the “Contiguous” option in the options bar is checked. This means that Photoshop will only select pixels that are connected or adjacent to the clicked pixel. Can I use the Magic Wand Tool to select a part of an image that is not connected?Yes, you can use this tool to select a part of an image that is not connected. Uncheck the “Contiguous” option in the bar, and Photoshop will select pixels depending on their similarity throughout the image. What can I do if this tool isn’t selecting the desired area?If this tool isn’t selecting the desired area, adjust the tool’s tolerance in the options bar. A higher value will expand the selection, while a lower value will make it more precise. Can I become a master of using the tool named Magic Wand in Photoshop?Yes, with practice and learning more about Photoshop, you can become a master of using the tool. There are many tutorials available online that can help you improve your skills. Final Thought You will face the challenge of using the magic wand tool in a few images. While using it in other images will give you little trouble. You can get great images with a couple of easy tips and tricks. Follow the above step-by-step guidelines and learn how to remove and replace an image background using the discussed tool and give your image a beautiful look. You may Read: How to Create a Clipping Path in Photoshop How to Remove All of One Color in Photoshop in 2 Minutes How to Use Background Eraser Tool in Photoshop CC How to Edit Photos in Photoshop February 25, 2024 February 25, 2024 What is a Clipping Path – Simple Explanation (How and Why) Macro Photography: The Complete Guide for Beginners 2025 Mastering White Background Removal in Photoshop CC Convert White Background into Transparent Background with 3 Methods Edit Photo Background in Photoshop CC 25

Magic wand untuk apa?

Alat ini berfungsi secara efektif sebagai vibrator klitoris dan mampu menghasilkan orgasme pada banyak wanita.

# Article Title Keyword Article Link Article Details